June Daring Bakers Challenge: Charlotte Royale

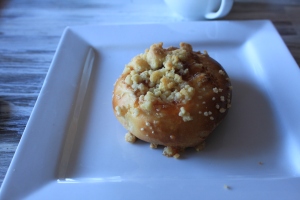
It seems that recently this has become daring bakers oriented. This is merely because I’m not finding the time to blog, I’m still baking incessantly. Anyway, this month, I bring to you the june daring bakers challenge:

For the June daring bakers challenge Rebecca from BakeNQuilt.comchallenged us to make Charlotte Royale and Charlotte Russe from scratch. Savory or sweet Charlottes were definitely tasty showstopper.

I chose to do a charlotte royale. A sweet one. Obviously. A caramel and passionfruit swiss roll paired with a caramel bavarian cream. But really, I want to do it all again with more flavours! The possibilities are endless and have definitely got my neurone firing (nerd speak for brainstorming).

IMG_2680

Charlotte Royale

Biscuite Roulade

Ingredients

33g sifted cake flour

23g unsifted cornstarch

4 large eggs (room temperature)

room temperature

½ cup plus 1 tablespoon (113g) sugar, divided

¾ teaspoon vanilla

¼ teaspoon cream of tartar

Directions:

Position the oven rack in the lower third of the oven and preheat oven to hot 450°F/230°C/gas mark 8.  Grease the jellyroll/sheet pan and line it with parchment and then grease it again and flour it. You may use baking spray with flour included if desired.

In a small bowl, whisk together the cake flour and cornstarch.

Separate 2 of the eggs, placing the yolks in one large mixing bowl and the whites in another.

To the yolks, add the 2 remaining eggs, and ½ cup of the sugar.

Beat the yolk mixture with the paddle attachment on high speed for 5 minutes or until thick, fluffy and tripled in volume.  Beat in the vanilla.

Sift ½ the flour mixture over the egg mixture and fold it in gently but rapidly with a large balloon whisk (see notes), slotted skimmer spoon or rubber spatula until the flour has disappeared.  Repeat with the remaining flour mixture.

Beat the egg whites with the whisk attachment until foamy, add the cream of tartar and beat until soft peaks form when the beater is raised.  Beat in the remaining 1 tablespoon of sugar and beat until stiff peaks form when the beater is raised slowly.  Fold the whites into the batter and pour into the prepared pan, using an angled/offset metal spatula to level it.

Bake for 7 minutes or until golden brown, a cake tester comes out clean, and the cake is springy to the touch.

While the cake is still hot, you will need to set aside a piece for the base and roll the remainder in a towel as described below.

Cut off a piece from one of the ends just wide enough to cut the top from later as shown in the photo below.   Set this piece aside to cool.  After this piece has cooled, cut it with shears or a sharp knife into the circle for the Charlotte base.

While the cake is still hot, roll the remaining piece of cake up tightly in the dishtowel.  Roll from the longest side with the darkest side of the cake on the inside.  Cool the rolled cake/towel on a rack.

When ready to fill, gently unroll the cake and leave it on top of the towel.  Spread up to ½ cup of curd in a thin layer on top of the cooled cake and drizzle with caramel sauce, leaving it on the towel.

Roll up the cake as tightly as you can about 1/3 of the way and then use the towel to pull the roll towards you and press on the other side of the roll with a bench scraper or your hands to help make the roll tight as you continue to use the towel to help roll the cake all the way up.  The completed roll should be about 2” (5 cm) in diameter.  It is important to get this roll as tight as possible as you do not want gaps in the spirals.

Wrap the roll tightly in plastic wrap and then foil and freeze until firm enough to slice, at least a couple of hours.

Bavarian Cream:IMG_2681

Ingredients

65g sugar

Pinch of salt

1 tablespoon  unflavored gelatin powder

3 large egg yolks

400 ml milk

1 vanilla bean, split (you may also use extract/paste, but add it when the cream is cool

240 ml heavy cream

1½ tablespoon (22 ml) butterscotch baileys

Caramel Sauce (to taste)

Directions:

Refrigerate the mixing bowl for whipping the cream.

Have ready a fine strainer nearby, suspended over a small bowl.

whisk together the sugar, salt, gelatin and yolks until well blended, using a wooden spoon or mixer.

In another small saucepan heat the milk and vanilla bean to just below a simmer (170°F/77°C – 180°F/82°C).  There will be steam rising off the milk and there may be some small bubbles but it will not be at an active simmer yet.  Stir a few tablespoons of hot milk into the yolk mixture to temper it.  Gradually add the remaining hot milk and vanilla bean, stirring constantly.

Heat the egg and milk mixture, stirring constantly, to just below a simmer again (170°F/77°C – 180°F/82°C).  Steam will begin to appear and the mixture will be slightly thicker than heavy cream.  It will leave a well-defined track when a finger is run across the back of a spoon.   If the mixture gets too hot (above 180°F/82°C), the cream can curdle.  If this happens, immediately pour it into a blender and (with the vent open or a towel over the top) blend it to try to bring it back together smoothly.

Immediately remove from the heat and pour the mixture through the strainer (unless making the orange or lemon variations), scraping up the thickened cream that settles on the bottom of the pan.  Remove the vanilla bean and scrape the seeds into the sauce.  Stir until the seeds separate.

If time allows, chill the pastry cream in the refrigerator for about 1½ hours (checking frequently and stirring occasionally) until whisk marks barely begin to appear when stirred.   For faster results, cool the sauce over an ice-water bath, stirring with a whisk, until whisk marks barely begin to appear.  The mixture will start to set around the edges but will still be very liquid.

In the chilled bowl, whip the cream until it mounds softly when dropped from a spoon.

Whisk the Baileys and caramel into the pastry cream and then fold in the whipped cream just until incorporated.  The mixture will be soupy, like melted ice cream.

Directions for assembly:

Lightly oil a 6-cup (1½ litre) round bowl or mold (the smaller the diameter at the top the better) and line it as smoothly as possible with plastic wrap, leaving a small overhang.  Measure the diameter of the bowl and make note of it.  You will need a round cake base of this size for the bottom of the Charlotte.   Note:  If the diameter of the top of your 6 cup bowl is very wide, you may want to make an additional 1/2 recipe of the cake in a smaller pan to make sure there is enough for the roll as well as the base.  Alternately, you can use a smaller bowl.

When the roll is firm, cut it into ¼ inch (5 mm) slices with a small, serrated knife.  You want to get as many spirals as possible, so be careful to evenly cut the slices as close to ¼ inch (5 mm) as you can.  Work quickly so the cake roll doesn’t thaw and soften too much.

To line the bowl, place 1 slice in the center and place other slices around it as tightly as possible to try to avoid gaps.

Cover the lined bowl tightly and place it in the refrigerator until the filling is ready.

Make the Bavarian cream and spoon it into the lined bowl until it comes up to the top of the bowl or just to the place the top spirals last touch each other.  Trim the top spirals even above the cream if necessary.

Place the cake round on top of the cream and touching the edge of the spirals.   Press down gently on the edges of the cake circle so it makes contact with the edge of the spirals.

Cover tightly and refrigerate until set, at least 8 hours.

To unmold, invert onto a plate and lift away the bowl, tugging gently on the plastic wrap to release it.

IMG_2693IMG_2689

Cherry Cake

IMG_2486It’s been a while since we’ve had cake, just for us in the house. By a while I mean like three weeks. Over Easter, hot cross buns were made and chocolate was consumed, but the desire for a nice cake was fulfilled this weekend. I gave Sweetapolitia’s Cherry Cake a try, with a few adaptations of my own, and created a cute pink 6″ maraschino cherry and almond cake that was moist and ‘practically perfect in every way’ (yes I may have been watching Mary Poppins too).

I also found a use for my little cupcake stand, which I always forget about when photographing actual cupcakes. So it was temporarily converted into a maraschino cherry stand for these photos. Also our roses are in bloom constantly, so why not take advantage of it?

3 steps:

Make this cake

Eat this cake

Repeat. Because you’ll want to.

IMG_2496

Cherry Cake: makes 3 six inch layers

Ingredients

  • 180g flour
  • 225g sugarIMG_2499
  • 13g baking powder
  • 85g cold butter, cut into pieces
  • 150ml milk, room temperature
  • 2 tablespoons Maraschino cherry juice
  • 1/2 teaspoon fresh lemon juice
  • 1 teaspoon pure vanilla extract
  • 2 extra large egg whites, room temperature (or 3 large ones)
  • pink food colouring
  • About 15 Maraschino cherries, halved or quartered

Instructions

  1. Preheat oven to 180˚C. Grease and line the bottoms of three 6″ tins.
  2. In the bowl of stand mixer with paddle attachment, combine the flour, sugar, baking powder on low speed.
  3. Add in the butter one piece at a time. Beat on low speed until all the butter has been incorporated, about 3 minutes. The mixture should have a fine crumbly texture.
  4. Combine half the milk, the cherry juice, lemon juice, and vanilla.
  5. In a separate measuring cup, gently whisk the egg whites and remaining milk.
  6. With stand mixer on low speed, gradually add the cherry juice mixture, followed by colour and beat until combined and smooth.
  7. Put the mixer back on low speed and add the egg white mixture in three parts, scraping down the sides of the bowl after each addition. Beat for 1 minute.
  8. Toss the cherry bits in a little flour and gently fold them into the batter by hand.
  9. Divide the batter evenly among the prepared pans.
  10. Bake for 20-25 minutes or until a toothpick inserted into the center is removed with few crumbs.

Icing

  • 100g butterIMG_2487
  • 70g cream cheese
  • 1 tsp vanilla bean paste
  • 1 tsp maraschino cherry juice
  • 250g icing sugar
  1. Beat butter until pale and fluffy
  2. Add the cream cheese, vanilla, cherry juice and half the icing sugar and beat on low until a smooth paste forms.
  3. Add the rest of the icing sugar and beat on high until fluffy.
  4. Ice as desired.

IMG_2492

Fondant Creations

So I don’t know about you but when I see those beautiful cakes made smooth and perfect with rolled fondant, I am both impressed and disappointed. Yeah they look good, but the majority of people peel the fondant off, because it tastes less than fantastic. When needing to do a novelty cake, I wanted to avoid using it but still achieve the neat finish. Enter marshmallow fondant! I’ve come across recipes for it often on Pinterest but I’ve been skeptical. After some experimentation, I found it easy to make, easy to roll, easy to colour and it doesn’t go sticky or fall apart. And it tastes like marshmallows! I haven’t tried flavouring it, but I’m sure its possible too.  From now on this will be my go to fondant.

The ratio of marshmallow to icing sugar is 1:1 so its easy to scale the recipe up and down. It probably makes life easier to sift your icing sugar before adding it to the marshmallow but I’ve done it without as well (it just takes a bit more kneading). If you want to colour the fondant its easiest to just use the white marshmallows.

Recipe

240g marshmallows

240g icing sugar (plus extra for dusting)

Melt the marshmallows in the microwave for 1 minute or until puffed up and soft. If they’re still solid then do 10 second bursts.

Gradually add the icing sugar while stirring.

Once all the icing sugar is added (not fully combined) scrap the mix onto a surface dusted with icing sugar. Dust your hands as well.

Knead the fondant until smooth and no longer sticky (adding icing sugar as needed).

Add colour now if needed. It can be rolled out and used immediately or stored in cling wrap in the fridge or freezer.

10985308_1593923630853634_8552019211688538815_n

Vanilla Chiffon Cake with Blackberries

IMG_9173My mum was reading through some old recipes from her grandmother and decided to try a few out. She chose gingerbread and I chose the vanilla chiffon. There’s something lovely and welcoming about a chiffon cake, soft and light and a good match for a strong fruit filling. So i made a blackberry jam type filling and topped it with a vanilla bean icing. A lovely cake passed down through generations, we shall continue to enjoy it.

CakeIMG_9182

Ingredients

1 cup flour

1/3 cup sugar

1 1/2 tsp baking powder

4 eggs (separated)

1/3 cup cold water

1/4 cup oil

Method

Preheat oven to 180˚C

Sift flour, sugar and baking powder

Make a well and add the egg yolks, water and oil. Beat until smooth

In a separate bowl whisk the egg whites until stiff

Pour the egg/flour mix over the whites and gently fold until just combined

Bake in prepared tine for 30-35 minutes

Jam 

Ingredients

500g blackberries

1/4 cup sugar

1/4 cup water

1 tsp vanilla

Method

Combine all the ingredients in a saucepan and boil until thick and jam like

Allow to cool before filling the cake

Icing 

Ingredients

50g butter

75g cream cheese

250g icing sugar

1 tsp vanilla bean paste

Method

beat butter until pale

Add the cream cheese, half of the icing sugar and the vanilla bean paste and slowly beat until combined

Add the rest of the icing sugar and beat until fluffy

IMG_9180


Daring Bakers January 2015: Esterhazy Torte

IMG_2183
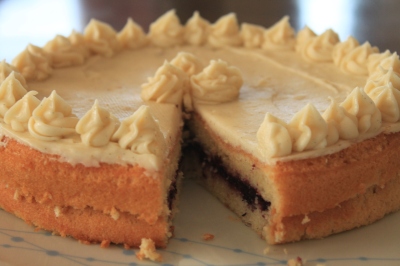
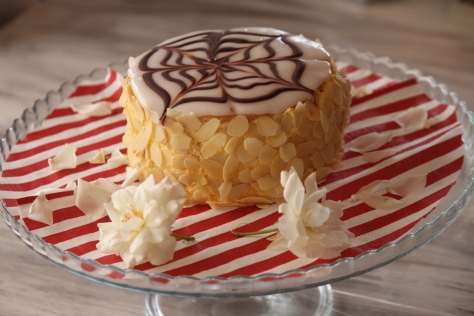
For the month of January Jelena from A Kingdom for a Cake invited us to start this year with a dreamy celebration cake. She challenged us to make the Esterhazy cake a.k.a the Hungarian dream. What better way to start the year than with a sweet dream?

Here we are in January, the month of beginnings, and here I am posting this daring baker’s challenge, recovering from a tonsillectomy. As much as I am hating everything right now and it hurts sooo much, hopefully this’ll be the start of a good year. I’ll keep this short and sweet as the painkillers are probably going to leave me pretty illiterate shortly. This torte was lovely, the original recipe called for hazelnuts but we’re more of an almond family. We (well, the rest of the country anyway) celebrated Australia Day yesterday and this cake resembles a vanilla slice (the Aussie millefeuille) so it’s appropriate for that too.

Ingredients

DACQUOISE LAYERS

6 large egg whites

125g caster (superfine) sugar

10 g vanilla

125g ground almonds

40 g plain (all purpose) flour

ALMOND CREAM

6 large egg yolks

125g caster (superfine) sugar

10 g vanilla

150g butter at room temperatureIMG_2186

75g ground almonds

APRICOT JAM GLAZE
45g apricot jam
1 teaspoon (5 ml) water

WHITE ICING
200g icing sugar
5 ml sunflower oil
15ml lemon juice
around 2 tablespoons (60 ml) hot water

CHOCOLATE DECORATION
25g dark chocolate
1 teaspoon (5 ml) oil
50g slivered almonds

Directions:

DACQUOISE

With an electric mixer beat the egg whites while gradually adding the sugar and vanilla sugar for about 5 minutes until stiff peaks form.

Turn the mixer to the lowest speed and add in the almonds mixed with the flour and beat until just combined.

Cut baking paper into five squares large enough to draw a circle of 5 inch in diameter on the squares.

Turn the paper over and place one piece onto an up-side down oven tray and delicately spoon inside the circle one-fifth of the beaten egg white mixture.

Place the tray into an preheated moderate 160°C oven and bake for 14 minutes. It will look soft but that is how we want them. Your finger should not stick to the layer when you touch it.

Take the layer out together with the paper and place on an even surface

Cool the oven tray and repeat with the next 4 layers. It is important that the up-side down oven tray is cool when you start to bake the layers.

ALMOND FILLING

The filling is cooked in a double boiler. If you do not have a double boiler just take two pots so that the smaller one fits perfectly in the larger one and there is no gap between them.

Fill the larger pot with about 1-inch (2 cm) water place on the stove and bring the water to a slow boil, the water should not touch the smaller pot bottom.

Beat the egg yolks and the sugar with an electric mixer in the smaller pot for 30 seconds. Place the smaller pot into the larger one and cook for 14-15 minutes. Stir every 2-3 minutes for a short while with a wooden spoon always scraping the sides and the bottom. Stir constantly, near the end.

Let it cool

Beat for 30 seconds

Beat the room temperature butter for 2 minutes until light and fluffy then beat into the cooked yolks

Add in the ground almonds and beat again until combined.

Set aside 2 tablespoons of the filling to spread around the torte at the end.

Divide the rest of the filling into 4 cups.

Line a large tray with some baking paper.

Remove the baking paper from one of the dacquoise and place it onto the tray, spread one quantity of filing evenly over the dacquoise, then place another layer on the top.

Repeat, making sure that the last layer is placed bottom-side-up (do not place filling on this surface) which will make it easier to obtain a smooth looking finish.

Place in the fridge for 1 hour

APRICOT JAM GLAZE

Heat the apricot jam and water on the stove.

Remove the top baking paper from the torte and spread the jam on top of it. We want a very thin layer, just barely covering the torte.

Place the torte back in the fridge for 30 minutes for the jam to cool.

When the 30 minutes is up, spread the 2 tablespoons of reserved filling around the cake.

WHITE ICING

By hand mix the powdered sugar, oil, lemon juice while adding teaspoon by teaspoon of hot water until the mixture is creamy, but not runny. Mix vigorously for a couple of minutes. The sugar should be lemony.

With a hot wet large knife quickly spread the icing over the apricot layer.

DECORATION

Before starting with the icing have the chocolate ready since it needs to go onto the soft icing in order to get the web.

Melt the chocolate with a teaspoon of oil, place in a pipping bag, or a  plastic bag with a cut in the corner that will act as the tip.

Draw four (4) concentric circles onto the cake, then with a knife (not the sharp side) or a wooden skewer run six (6) lines at 30 degree angle to the cake to get the decoration (see pictures for more details). Each line should be in a different direction. One running away from you and the next one running to you.

Press the slivered almonds around the cake to complete the decoration.

IMG_2192 IMG_2197

Daring Bakers December Challenge: Dutch Sweet Bread

For the month of December, Andrea from 4pure took us on a trip to the Netherlands. She challenged us to take our taste buds on a joyride through the land of sugar and spice by baking three different types of Dutch sweet bread” 

IMG_1826

As usual December has been so hectic; holidays, baking, parties and presents. I love Christmas, it’s my favourite time of year. However, I left this challenge right down to the line: made this morning, cooled and photographed midmorning, editing at lunch, upload now. And to be honest, I don’t feel like baking, because we’ve got soooo much food. But these are good, really good.  And even better because I made them in my new mini bundt tin! Will become a staple in our house I’m sure. So keep this recipe for when you feel like seeing food again.

IMG_1830

Kruidkoek

(I made half because, food, too much food)

Ingredients:

4 cups (960 ml) (17-2/3 oz) (500 gm) all-purpose (plain) flourIMG_1831

1½ teaspoons (7 gm) baking powder

2½ cups (600 ml) (17-2/3 oz) (500 gm) brown sugar, firmly packed

2 teaspoons (10 gm) ground cinnamon

2 teaspoons (10 gm) ground nutmeg

2 cups (500 ml) milk

Directions:

Preheat oven to moderate 180˚C and spray your tin. line with baking paper if using a loaf tin

Whisk flour, baking powder, cinnamon and nutmeg in a bowl

Put the milk in a small saucepan and warm until it almost comes to a boil. Remove from the heat

add the sugar and whisk until the sugar has dissolved.

Pour the milk mixture into the dry ingredients whisk (by hand or using a machine) until the batter is totally smooth.

Pour into tins and bake for 13-15 minutes.

IMG_1839

A special chocolate and orange birthday

IMG_1619
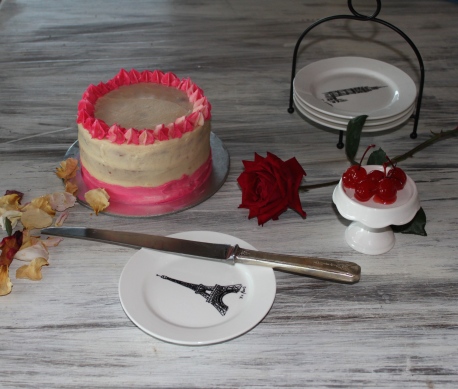
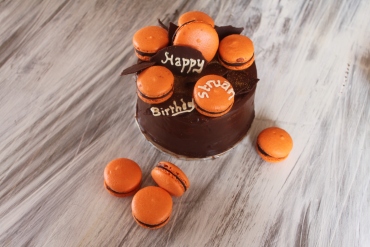
Happy birthday to my boyfriend! I made this cake last yearand it was such a success, he asked for the exact same cake… of course I wasn’t too keen on repeating things, so looked for another flavour; cue chocolate and orange. Chocolate cake with orange french buttercream, chocolate ganache and chocolate orange macarons. Cake making went smoothly, buttercream was perfect, the macarons played ball and decorating was relatively uneventful, though ganaching a cake is still not my favourite thing to do.

The chocolate cake is the same cake as last year, but i used 3/4 of the batter for the cake to make 3 6inch layers and used the other 1/4 to make 3 cupcakes. Because a 4 layer cake would have been excessive and ridiculously tall.

A little bit about french buttercream: rich, silky and smooth, its made like italian meringue buttercream but with egg yolks instead of whites. I find it less buttery. It works fantastically to fill cakes.

I used almond milk for the ganache, because well almond milk is awesome. and healthier than cream.

Cake

  • 100g almond meal
  • 3 eggs
  • 180g brown sugar
  • 300g peeled and grated courgette
  • 120g flour
  • 60g cocoa powder
  • 2tsp baking powder
  • orange zest (1 orange)

Preheat oven to 180˚C, line and grease 3 6 inch tins.

Whisk eggs and sugar until pale and fluffy.

Add courgette and almond meal, then the flour, cocoa and baking powder and orange zest. Beat until incorporated

Pour 1/4 of mix into cupcake liners and the other 3/4 evenly into the tins and bake for 20-30 mins

Buttercream

4 egg yolks

1 cup sugar

1/3 cup water

orange zest (2 oranges)

200g butter

red and yellow colouring

  • whisk the yolks until paleIMG_1622
  • while whisking, combine sugar and water in saucepan over medium heat
  • when the sugar reaches softball (115˚C) take off the heat and slowly stream into the yolks while whisking
  • once cool (10mins) gradually add the butter, zest and colouring.

Ganache

250 g dark chocolate

125 ml almond milk

  • heat almond milk until simmering, then pour it over the chopped up chocolate
  • after 3 minutes or so stir until smooth.
  • cool until peanut butter texture

IMG_1625

Assembly

Place the bottom layer on a 6 inch cake board

Pipe a border of ganache and layer with 1/3 buttercream

Place the next layer of cake on top and repeat the piping and filling step.

Place the final layer of cake on top

Place the whole thing in the fridge to firm up

Ice with ganche

Top with macarons

IMG_1628

100’s and 1000’s Chocolate cake with Malted chocolate Icing

IMG_1562

So when life gives you lemons… trade them in for some sprinkles, because to be honest, you can’t stay sad when there are sprinkles involved. So a bit of therapy for me during the last few weeks of uni was to bake a cake and throw a tonne of sprinkles on it. Actually, I had baked the cake the week before, and made the icing, but in the end I didn’t need either, so they went into the freezer until the need arose to (as mentioned) throw some sprinkles around.

IMG_1595

Topped with these cute cupcake toppers, who could fail to smile when looking at this cake. Also it doesn’t hurt that it tasted good too. Malted chocolate icing and a dark chocolates cake, filled with a whipped caramel cream filling. And sprinkles. don’t forget the sprinkles. So look, read, and bake. And most importantly, don’t forget to smile.

IMG_1578

Cake

  • 165 g all-purpose flour
  • 300 g granulated sugar
  • 65g Dutch Cocoa Powder
  • 10g baking soda
  • 5 g baking powder
  • 1 egg, at room temperature
  • 180 ml buttermilk, room temperatureIMG_1553
  • 1800 ml strong black coffee, hot
  • 60 ml vegetable oil
  • 5 ml pure vanilla extract
  1. Preheat oven to 180˚C. Prepare 2 8-inch round cake pans.
  2. In bowl of electric mixer, sift all dry ingredients, including sugar. Combine eggs, buttermilk, coffee, oil and vanilla in a measuring cup and beat lightly with a fork.
  3. Add milk mixture to the dry ingredients mix for 2 minutes on medium speed. Divide batter evenly among prepared pans. (Batter will be thin)
  4. Bake for 20 minutes and rotate pans in oven. Continue to bake until toothpick or skewer comes almost clean, about 12 more minutes. Cool on wire racks for 20 minutes then gently invert onto racks until completely cool


Malted Chocolate Icing

  • 220 g butter, at room temperature
  • 300 g icing sugar
  • 50 g Ovaltine Classic
  • 1 tablespoon (15 mL) pure vanilla extract
  • 125g quality chocolate, chopped, melted and cooled
  • 60 ml whipping cream
  1. In a bowl of stand mixer fitted with paddle attachment, combine the icing sugar and butter and beat on low speed for about 1 minute.
  2. Add malt powder, vanilla and salt, and beat on low until well combined. Add the melted chocolate and beat on medium speed until smooth (about 2 minutes).
  3. Add whipping cream and beat on med-high speed for another minute.


Whipped Caramel Cream FillingIMG_1574

  • 125ml whipping cream
  • 120g cream cheese
  • 100g melted caramel chocolate baking chips
  1. whip the cream until thickened and peaks just start to form
  2. Gradually add the cream cheese followed by the chocolate, with the mixer on low.
  3. Increase the speed until firm peaks form and the filling is spreadable


Assembly

Once cakes are cooled, place the bottom layer on a plate of your choice or a turntable for icing smoothing.

Spread a thick layer of the filling on top, then place the second cake on top.

Ice a crumb coat of the malt icing, then refrigerate for 10 minutes (minimum)

Ice your cake as you like it.

Attack with sprinkles.

Smile

IMG_1559


Sachertorte: October Daring Bakers’ Challenge

 for-db The October Daring Bakers’ challenge was brought to us by Korena of Korena in the Kitchen. She took us to Austria and introduced us to the wonders of the Sachertorte.for-db2

Busy busy! Still baking a lot but I don’t have an awful lot of time to photograph and post. After this week I should have more time. But I made the effort with the daring baker’s challenge this month because it was a cake!!! After all the yeast challenges (and in my wintery kitchen with my rainy Perth weather they really were challenges), I was excited to finally have a cake challenge. Though not entirely a hit, it was fun to learn about and fun to make.

IMG_1603Cake Ingredients

125 g good quality bittersweet chocolate, chopped
125 g unsalted butter, softened at room temperature
125 g confectioners’ sugar (aka icing sugar or powdered sugar)
6 large eggs, separated, at room temperature
1 teaspoon (5 ml) vanilla extract
100 gm granulated sugar
125 g all-purpose (plain) flour
pinch fine grain salt

1. Preheat oven to 190˚C with a rack in the centre of the oven. Butter and flower the sides of a 9-inch (23 cm) springform pan, then line the bottom with a circle of parchment paper.

2. Place the bittersweet chocolate in a heat-proof bowl and heat over a small saucepan of barely simmering water (make sure that the bowl is not touching the simmering water) or in the microwave until just melted. Set aside to cool completely, stirring often.

3. Place the butter in a large mixing bowl and beat with the paddle attachment of a stand mixer or electric mixer on medium speed until very light and creamy. Add the confectioners’ sugar on low speed, then increase to medium speed and beat again until light and creamy.

4. Beat in the egg yolks, one at a time, scraping down the sides of the bowl.

5. Add the cooled chocolate and vanilla and beat until well-mixed and very light and creamy, scraping down the sides of the bowl.

6. In a scrupulously clean bowl using the whisk attachment, beat the egg whites with about one tablespoon of the granulated sugar on high speed until foamy. Gradually add in the rest of the granulated sugar and continue beating the whites until they form soft, shiny peaks – they should hold their shape but flop over on themselves.

7. Vigorously stir about 1/3 of the whipped egg whites into the chocolate mixture to lighten it, then gently fold the remaining egg whites into the chocolate mixture with a spatula until just a few wisps of egg white remain. Do this carefully so as not to deflate the egg whites.

8. Stir together the flour and salt and sift half of it over the chocolate mixture. Fold in with a spatula until almost incorporated. Sift over the remaining flour and fold to combine completely.

9. Spread the batter evenly in the prepared springform pan.

10. Bake in the preheated moderately hot 375˚F/350°F fan/190˚C/gas mark 5 oven for 35-45 minutes (mine took exactly 40 minutes) or until a toothpick inserted in the middle comes out clean. The cake will crack and dome in the middle as it bakes but will flatten out as it cools.

11. Cool in the pan for 10 minutes, then run a knife around the edge to loosen it from the pan and remove the sides. Carefully invert the cake onto a rack and remove the bottom of the pan and parchment paper, then turn the cake right-side up onto a rack and allow to cool completely.

12. Assembly: Turn the cake upside-down so that the perfectly flat bottom of the cake is now the top. Cut the cake horizontally into 2 even layers.

13. Place 1 cake layer on the 8½-inch (22 cm) cardboard cake round and spread it generously with about half of the apricot glaze. Allow it to soak in.

14. Place the second cake layer on top and spread the top and sides with the remaining apricot glaze. Work quickly before the glaze has a chance to set and use a metal offset spatula to smooth the top. Place the cake on a rack set over a plate or baking sheet lined with waxed paper and allow the apricot glaze to set.

15. Make the chocolate glaze (it must be used immediately, while still hot) and pour it over the top of the cake, first around the edge and then in the middle. Spread the excess glaze over any bare spots using a metal offset spatula. Before the glaze has a chance to set, move the cake to a serving platter.

Apricot Glaze

1¼ cup apricot jam or preserves
2 tablespoons rum (or other liquor) or water

Directions:

1. Boil the jam and rum/water in a small saucepan over medium heat.
2. Cook, stirring often, until the mixture thickens and drips slowly from the spoon, about 2-3 minutes.
3. Strain through a wire mesh sieve, pressing firmly on the solids. You should have about 1 cup of glaze. Use warm.

Chocolate Glaze

1 cup (240 ml) (7 oz) (200 g) granulated sugar
½ cup (120 ml) water
(4 oz) (115 gm) good quality bittersweet chocolate, chopped

Directions:

1. Place the sugar and water in a small, heavy-bottomed saucepan over medium-high heat and bring to a boil, stirring occasionally.
2. Attach a candy thermometer and cook, stirring, until the mixture reaches12°C
3. Remove the saucepan from the heat and whisk in the chocolate. It might thicken up quite a bit. If it does, return it to low heat and add a few drops of water if necessary to thin it out to a runny, pourable consistency. The glaze should be smooth and shiny.IMG_1606

Daring Bakers September Challenge: Dvojctihodné / Moravské koláče (Two fillings / Moravian Kolaches)

The September Daring Bakers’ challenge was brought to us by Lucie from ChezLucie. She challenged us to make a true Czech treat –Kolaches!

Wow things are hectic at the moment. So much is going on with assignments due all the time, but considering I haven’t done the last two challenges I told myself I must try this one. My heart sank when I saw dough and yeast again, due to my recent failures with sourdough. I’ve had a bit of a confidence knock when it comes to bread. But thankfully all went to planned this time around. At the same time as making these czech treats, I dared a simple sourdough loaf, which, though  far from perfect, was edible and enjoyable. After all this was a Daring Bakers challenge!IMG_1488

Anyway, these koláče were lovely. The perfect saturday morning breakfast, I filled them with apricot and strawberry jam as I didn’t have plum. I also substituted cream cheese for quark as I didn’t have any… except of course for the usual subatomic particles that make up everything. Sorry, physics nerd….

Anyway, enjoy my daring bake, and attempt your own!

IMG_1489Ingredients

for dough
500 g all-purpose flour
100 g sugar
250 ml milk, warm
75 g butter, melted
30 g fresh yeast or  15 g active day yeast
pinch of salt
2 small egg yolks

for quark filling
750 g quark or cream cheese
1 small egg yolkIMG_1490
confectioner’s (icing) sugar to taste

for jam filling
strawberry, apricot, plum (jam of your choice)

for streusel topping
50 g plain flour
50 g butter, chilled and diced
50 g sugar

for finish
1 egg

Directions:
In a bowl mix together yeast and 1 teaspoon sugar. Add 4 tablespoons (¼ cup) warm milk, mix well and sprinkle with 1 tablespoon flour. Cover with plastic wrap and let rest for 10 – 15 minutes.
In a bowl of your electric mixer (or in a large bowl) mix flour, sugar, salt, egg yolks, butter, milk and leavened yeast. Knead with dough hook (or with wooden spoon) on low speed for about 10 minutes. Cover with plastic wrap and let rise for about one hour to double its volume.

Meanwhile prepare quark filling – just mix all ingredients – and jam filling – mix jam with rum or water to soften it. Set aside.

Prepare streusel topping. In a medium bowl, mix together sugar, flour and cinnamon. Add cold butter diced in small cubes and with your fingers, mix all ingredients until crumbly. You can also use my mum’s trick – in a saucepan melt the butter, add flour and sugar at once and mix with fork until crumbly. Set aside.

When the dough is risen turn it onto a lightly floured surface and roll it with rolling pin to a thickness of about 2 cm (¾ inch). Cut with 10cm (4 inch) cookie cutter or just with a glass (if you want small kolaches) or divide the dough into 10 equal pieces (if you want large kolaches). Splat each piece with your hands and fill with quark filling. Wrap it into a “purse” shape.

Preheat oven to moderate 340°F/170°C/gas mark 3. Line 2 – 3 baking sheets with parchment paper. Put each kolach onto a prepared baking sheet with seam down. Press each kolach in the middle as you can see on the picture below. Brush it with egg wash and fill holes with plum filling. Sprinkle it with streusel topping. Bake for about 20 minutes to golden brown.IMG_1491